
Waterproof Camera Bags: The 13-Point OEM Spec Guide
A waterproof camera bag has to be specified with three separate numbers, not one marketing word: shell fabric at 10,000 mm hydrostatic head minimum by ISO 811, closure performance to IEC 60529 IPX6 or better, and seam integrity verified by AATCC 22 spray and AATCC 35 shower testing. QUANZHOU JUNYUAN BAGS builds photo programmes to 10,000-20,000 mm+ shells with RF-welded or taped seams, 500 pcs per style per colour minimum, sampling in 6-10 working days and bulk production in 35-50 days from FOB Xiamen, inspected to AQL 2.5 under ISO 2859-1.
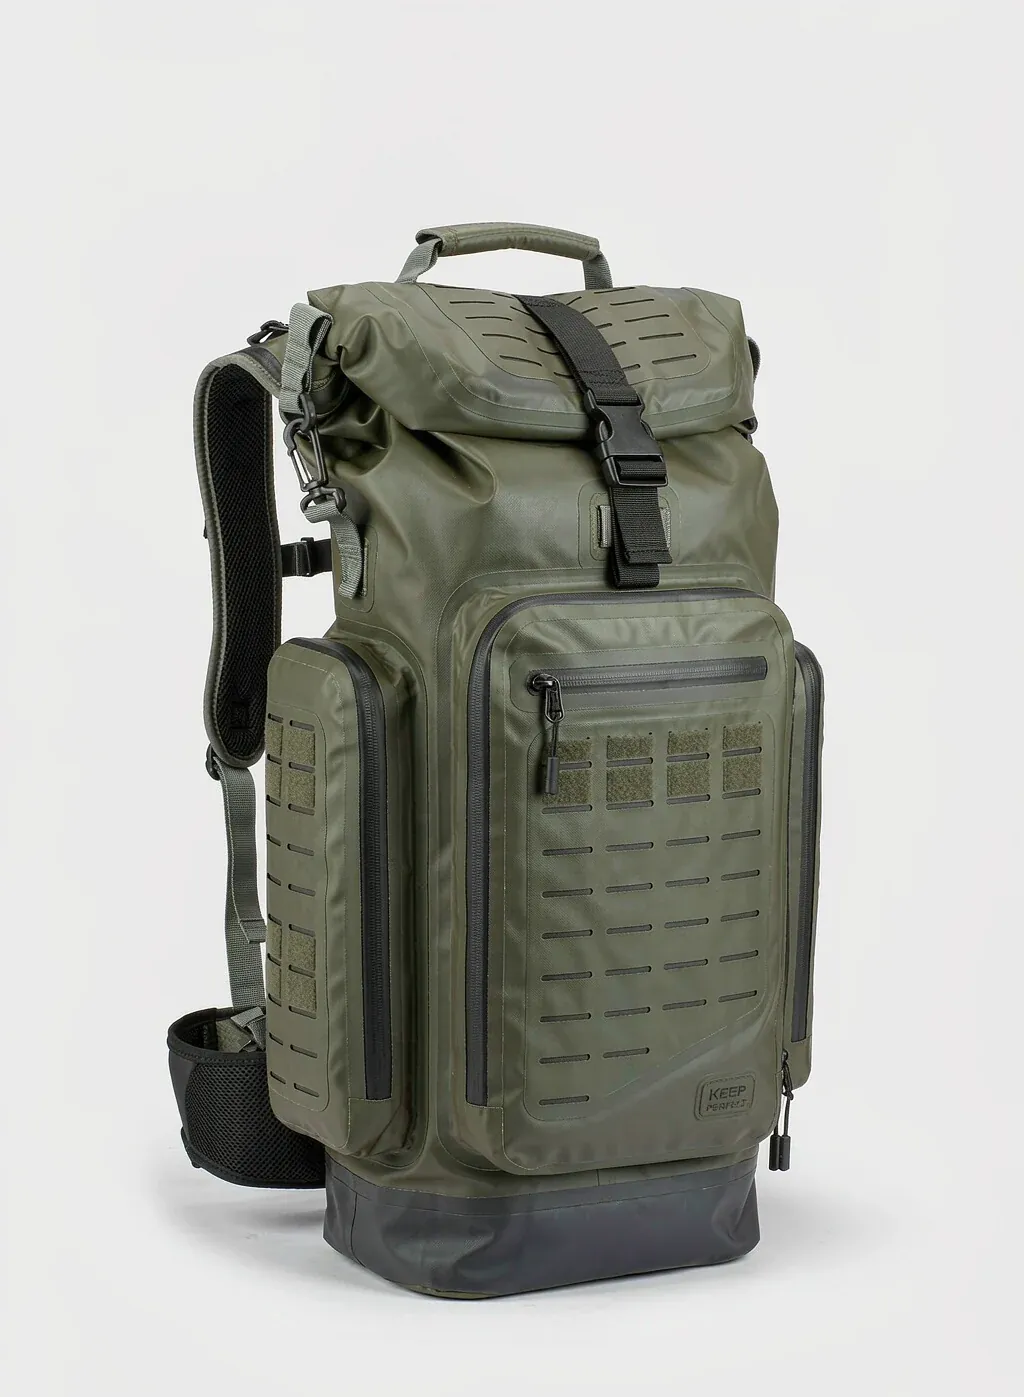
Table of Contents
- What Waterproof Has to Mean for a Camera Bag
- Shell Fabric and Coating Choices for Camera Bags
- Foam Insert Geometry and Lens Cradle Loading
- Closure Architecture: Roll-Top, Flap and Toothed Seal
- The 1.2 m Loaded Drop Test We Run on Photo Kits
- Rain, Spray and Hose Ingress Testing for Camera Bags
- Humidity, Desiccant and Condensation Inside a Camera Bag
- Hard-Shell Case versus Soft-Shell Camera Bag Compared
- Failure Modes Found in Returned Camera Bags
- Carry Configuration: Backpack, Sling and Shoulder Loads
- Strap Harness, Padding and Shoot-Day Fatigue
- Branding and Colourway Execution for Camera Bags
- MOQ, Sampling and the Camera Bag Production Window
- Frequently Asked Questions
- People Also Ask
What Waterproof Has to Mean for a Camera Bag
A camera bag is not a dry bag with dividers fitted inside. It carries between 3 kg and 12 kg of bodies, glass, batteries and cards, and the water that ruins that load rarely arrives as one dramatic dunking. It arrives as rain driven sideways into a flap seam, as condensation forming on a cold lens barrel inside a closed compartment, and as deck spray that wicks along a top-handle stitch line for two hours before anyone unzips the bag. A spec written around a single dunking test will pass in the lab and fail on a shoot.
We therefore split the waterproof target into three measurable numbers before a tech pack is signed off. The shell is specified by hydrostatic head under ISO 811, with 10,000 mm as the entry point for lightweight photo shells and 20,000 mm+ for expedition and marine-adjacent programmes. The closure is specified against the ingress protection code in IEC 60529, usually IPX6 for a weather-sealed flap and IPX7 or IPX8 for a roll-top or a submersible insert. The seam is specified by spray resistance under AATCC 22 and by shower resistance under AATCC 35, because a 10,000 mm fabric sewn with a plain needle seam leaks at the needle holes long before the fabric itself gives up.
Those three numbers interact. A 13 L shoulder bag protecting a mirrorless kit on a wet city street needs a high spray rating and a fast-access closure, and it can live with a moderate hydrostatic head. An 8 L submersible insert that rides inside a kayak hatch needs the opposite: the closure is barely opened all day, so the priority is a welded body with no needle holes at all and a 20,000 mm+ shell. Writing the three numbers separately at the start of a programme is what lets us quote correctly, because the fabric, the weld tooling and the hardware budget move in different directions for each one. Our waterproof standards reference lays out how these three families of test relate to each other.
Shell Fabric and Coating Choices for Camera Bags
Photo shells are chosen for puncture and abrasion behaviour as much as for water column, because a camera bag is carried against jacket zips, belt buckles, tripod legs and boat gunwales. The two dominant constructions are a polyester or nylon face fabric with a TPU laminate on the back, and a PVC-coated scrim. TPU laminates hold flexibility down to lower temperatures and do not plasticise, which matters for a bag that may spend a night in a cold vehicle; PVC-coated scrims cost less per metre and weld more forgivingly, but they stiffen in the cold and can creep under sustained tripod-leg pressure.
Denier selection for camera bags is driven by the largest object the shell has to survive, not by the bag volume. A 420D face handles a compact mirrorless kit in a sling. A 600D or 840D face is the realistic minimum for a backpack that carries a 70-200 mm lens with a tripod collar and a folded tripod lashed to the side, because those two objects concentrate load onto a few square centimetres of fabric every time the bag is set down. Our working rules for photo programmes are:
- 420D TPU-laminated polyester for slings and inserts up to 6 L, hydrostatic head 10,000 mm, target finished weight under 380 g
- 600D TPU-laminated polyester for 8-16 L shoulder and backpack bodies, hydrostatic head 10,000-14,000 mm, the default for most private-label photo lines
- 840D or 1000D TPU-laminated nylon for 18 L+ expedition packs and for any bag with external tripod or gimbal lash points, hydrostatic head 20,000 mm+
- PVC-coated 500D scrim where the brief calls for a wipe-clean exterior and cold-flex is not a requirement, hydrostatic head 10,000 mm minimum
- A PFC-free durable water repellent finish on the face, so the outer face sheds the first shower and the shell underneath is not asked to do all the work
Abrasion is checked separately from water column, because a photo bag fails by scuffing long before it fails by soaking. We run face-fabric abrasion to ASTM D751 and Martindale cycles on the same fabric lot that goes into production, and we require the abrasion result to hold after the hydrostatic head target is met. If a cheaper fabric meets 10,000 mm but loses 30 percent of its coating in the first abrasion cycle, it is rejected for photo use regardless of the water column number. More on that trade-off is in our guide to waterproof ratings.
Foam Insert Geometry and Lens Cradle Loading
The insert is the part that makes a camera bag a camera bag, and it is also the part that most often gets value-engineered into uselessness. A divider is doing two jobs at once: it separates objects that would scratch each other, and it holds each object centred so that a drop loads the foam rather than the lens barrel. Both jobs depend on foam density and on divider height relative to the object, and they pull in opposite directions. Soft foam protects against vibration but lets a heavy telephoto sag; stiff foam holds shape but transmits a sharp impact straight to the mount.
We specify insert foam by density and by compression set rather than by thickness alone, because two foams of the same 10 mm thickness behave very differently after a season of use. For photo programmes the working range is 25-33 kg/m3 closed-cell PE foam for dividers, with a compression set below 10 percent after 22 hours at 70 degrees C. Anything softer sags under a 70-200 mm lens within weeks; anything harder needs to be thinner, which then costs you the side-wall crush protection. The table below is the cradle geometry we build to, and it is expressed in terms of the object being carried rather than in terms of the bag.
| Kit element | Divider foam spec | Cradle clearance | Notes for the tech pack |
|---|---|---|---|
| Mirrorless body, no grip | 25 kg/m3 PE, 8 mm | 6-10 mm perimeter | Body lies flat, allows 2 bodies in a 6 L sling |
| DSLR body with grip | 28 kg/m3 PE, 10 mm | 8-12 mm perimeter | Taller divider needed, adds 14 mm to internal height |
| 24-70 mm f/2.8 | 28 kg/m3 PE, 10 mm | 10 mm vertical | Lens carried hood-reversed to save 40 mm of depth |
| 70-200 mm f/2.8 | 33 kg/m3 PE, 12 mm | 12 mm vertical | Carried hood-forward, needs a cradle not a slot |
| 70-200 mm with tripod collar | 33 kg/m3 PE, 12 mm + collar relief | Collar sits on a cut-out | Collar must not bear on the shell or the seam tapes |
| Spare batteries and cards | 20 kg/m3 PE, 6 mm | Any | Separate from the lens zone to prevent contact shorting |
One detail that is easy to get wrong at the tooling stage is the collar relief. When a 70-200 mm lens is carried with its tripod collar fitted, the collar is the widest, sharpest part of the kit and it is also the part that carries the load. If the divider geometry forces the collar to press against the welded seam tape on the shell wall, you get two failure modes at once: the collar scuffs the tape, and the load path bypasses the foam. We cut a relief into the divider so the collar sits on foam, and we place the seam tapes on the outside of the bag body wherever the brief allows it. Our dedicated page on insert and cradle design covers the nesting patterns we use for mixed kits.
Closure Architecture: Roll-Top, Flap and Toothed Seal
Three closure families cover almost every photo brief, and they differ in what they protect against and in how fast a photographer can get to the camera. A roll-top closure is the strongest against immersion and the slowest to open. A storm flap over a coated zip is the fastest and the most dependent on the flap geometry. A toothed moulded-seal zip is the only one of the three that can be closed with one hand while the other hand is holding a body, and it is the most sensitive to grit.
Access speed is not a soft preference for this category; it is a design constraint that drives hardware selection. A wildlife photographer working from a hide needs a side-access flap that opens without unshouldering the bag. A documentary shooter in rain needs a top flap that sheds water while open, because the bag will be opened in the wet dozens of times a day. A kayak-based shooter needs the opposite priority entirely. We match closure to use case with the following matrix.
| Closure type | IEC 60529 target | Access time to first shot | Grit tolerance | Best photo application |
|---|---|---|---|---|
| Roll-top, 3 folds | IPX7-IPX8 | 6-9 seconds | High | Submersible inserts, kayak and canoe photography |
| Storm flap over coated zip, 40 mm overlap | IPX6 | 1-2 seconds | High | Documentary and street work in persistent rain |
| Moulded toothed seal zip | IPX6-IPX7 | 1-2 seconds | Low, needs a rinse channel | Studio-to-location transit, coastal work |
| Roll-top plus side-access flap | IPX7 | 2-3 seconds | Medium | Wildlife and sports, hide or blind based |
| Hard-shell latch with gasket | IPX7-IPX8 | 4-6 seconds | High | Check-in luggage and expedition transit cases |
The failure we see most often on toothed-seal zips in photo use is not water ingress, it is grit. Sand and dried salt get into the tooth profile, the slider starts to drag, and a photographer forces it, which deforms the profile permanently. If your brief involves beaches or salt water, we add a rinse channel at the base of the zip run and specify a slider with a larger pull so it can be worked with a gloved hand. Where the brief specifies immersion rather than rain, we drop the zip entirely and go to a roll-top, because a zip is a wear item and a roll-top is not.
The 1.2 m Loaded Drop Test We Run on Photo Kits
A fabric can pass every water test and still fail as a camera bag, because the real-world event that destroys photo kit is a drop, not a soaking. We therefore run a loaded drop test that no general-purpose bag standard covers, and we run it on the finished bag with the actual kit weight inside, not on an empty shell. The height is 1.2 m, which is roughly hip height for an adult and corresponds to a bag sliding off a table, a tailgate or a boat thwart. The load is steel masses shaped to approximate a body and a 70-200 mm lens, not sandbags, because point loading is the thing that breaks things.
How the drop sequence is executed
- The bag is loaded to its rated capacity with a 4.5 kg shaped body mass and a 1.5 kg shaped lens mass placed in the cradles the tech pack specifies
- Every closure is set to its fully closed position, and the tripod lash points are loaded with a 1.2 kg tripod where the brief includes them
- The bag is suspended by its grab handle and released onto a concrete floor in six orientations: base, lid, two side walls, front face and harness panel
- After each orientation the contents are inspected for mount deformation, and the shell and seam tapes are inspected for splitting at the impact point
- The sequence is repeated at minus 10 degrees C after 24 hours of conditioning, because a frozen shell behaves like a different material
- A bag passes only if all six orientations leave the contents undamaged and the shell intact, at both temperatures
The cold stage is the one that changes the design. A TPU-laminated 600D shell is still flexible at minus 10 degrees C and will absorb the impact by deforming. A PVC-coated scrim of the same weight stiffens noticeably at that temperature and tends to split at a corner seam rather than deform, which is why we do not specify PVC for any photo programme that will be used in genuine cold. The cold-flex behaviour is verified separately to a low-temperature bend test so we are not discovering it for the first time at the drop rig.
This test is also the reason we insist on a reinforced base panel with an internal stiffener on every camera backpack over 12 L. Without it, the base drops first, the lens mass loads the floor of the bag directly, and the mount takes the shock. With a stiffener plus 12 mm of closed-cell foam in the base, the load spreads across the panel and the foam does the work. The stiffener costs a small amount of weight and it is the single highest-value line item in a photo tech pack.
Rain, Spray and Hose Ingress Testing for Camera Bags
Water testing for camera bags runs in three stages, and we report all three separately because a bag can pass one and fail another. The first is a spray test under AATCC 22, which tells you how well the face fabric and finish shed water before the shell is even challenged. The second is a shower test under AATCC 35, which is a longer, higher-volume exposure that finds the weaknesses in flap geometry and zip garages. The third is a hose or jet exposure taken from the IEC 60529 method for IPX5 and IPX6, which is the one that separates a shower-resistant bag from a storm-worthy one.
The spray stage is measured as a 0-100 rating and it is mostly a finish test. A bag scoring 80 after twenty domestic wash-and-wear cycles has lost the finish that does the first line of defence, and it will start to wet out on the face, which makes the bag feel soaked to the user even when the contents are dry. We require 90-100 on new production and 80 or better after accelerated ageing. The shower and hose stages are the ones that decide whether the contents stay dry.
| Test stage | Method | Pass criterion for photo bags | Typical failure it exposes |
|---|---|---|---|
| Spray | AATCC 22, 250 ml, 25-30 s | 90-100 new, 80+ aged | Face finish gone, shell wets out and feels soaked |
| Shower | AATCC 35, 5 min, 2 L/min | No moisture on insert face | Flap too short, water tracks down the front panel |
| Jet | IPX5, 12.5 L/min, 3 m, 3 min | No ingress at closure or seams | Storm flap lift, zip garage missing or too shallow |
| Strong jet | IPX6, 100 L/min, 3 m, 3 min | Damp on outer divider only | Seam tape edge lifting under pressure |
| Immersion | IPX7, 1 m, 30 min | Interior dry, insert dry | Roll-top fold count too low for the fabric stiffness |
The one that most often fails on a first sample is the shower test, and the cause is almost always flap geometry rather than fabric. If the storm flap is shorter than 40 mm of overlap, or if it is cut straight across instead of being shaped with a downward taper at each end, water tracks along the front panel and enters at the flap corners. Sending a first sample out with the flap too short is the most common avoidable sampling round in this category, and it costs a full 6-10 working day cycle to correct. Our water ingress test methods page documents the equipment and the reporting template we use.
Humidity, Desiccant and Condensation Inside a Camera Bag
Condensation is the failure mode that a purely rain-focused spec misses entirely. A photographer comes in from a cold, wet environment, closes the bag, and puts it in a warm car or a heated room. The air inside the bag is cold and holds little moisture; as the bag warms, its relative humidity does not fall far enough to prevent water condensing on the coldest objects inside, which are the glass and the metal lens barrels. Over a season, that cycle fogs elements and grows fungus in the lens, and no amount of external waterproofing prevents it. This is the reason we treat the interior climate of a camera bag as a separate specification.
Two constructions address it, and they suit different briefs. The first is a desiccant pocket, a mesh sleeve sized for a 20-40 g silica cartridge, placed low in the bag near the base panel where the coldest air settles; it is cheap, it is proven, and we have to tell the end user to recharge it. The second is a vented construction with a breathable panel that lets the interior track the outside humidity, which prevents the trap entirely but does nothing for a bag that has just been in genuine rain. Our recommendations for photo programmes are:
- Add a 40 g desiccant pocket to every bag over 8 L that will be used in coastal or tropical humidity, positioned at the base panel
- Do not weld the entire interior; a welded body with a non-welded lid panel allows the worst of the trapped moisture to escape
- Specify a 6-8 mm air gap between the outer shell and the insert, so the cold glass is not touching a chilled wet panel
- Avoid a full rubber gasket on a bag intended for daily carry, because a perfect seal is exactly what makes condensation worse
- Include a printed care card telling the user to open and air the bag on return, since this is a use-phase failure, not a build defect
There is a genuine trade-off here that we put in front of every buyer at the sampling stage: the better the external seal, the worse the condensation risk for a user who never opens the bag. A submersible insert taken out of a kayak hatch and left closed in a hot car for two hours is a fungal incubator. A roll-top bag used the same way is less so, because the roll is not a perfect seal and it does let the interior equalise slowly. We will not sell a client a fully gasketed case for a daily-carry brief when a weather-sealed roll-top would serve them better, and we say so in writing at the quotation stage.
Hard-Shell Case versus Soft-Shell Camera Bag Compared
The photo category is the one bag category where a hard-shell case is a genuine alternative rather than a niche product, so it deserves its own comparison. A moulded hard case with a gasket latch will survive an impact that would destroy a soft bag, and it will survive being checked in as airline luggage. It costs more to tool, it cannot be compressed when empty, and it is slow to open. This table is the comparison we walk clients through, with the numbers we actually build to.
| Parameter | Moulded hard-shell case | Welded soft-shell camera bag | What it means for the buyer |
|---|---|---|---|
| Impact protection | Passes 1.2 m loaded drop at minus 10 degrees C | Passes with base stiffener, fails without | Hard case wins for transit and check-in |
| Ingress target | IPX7-IPX8 with gasket latch | IPX7 with roll-top, IPX6 with flap | Comparable when both are built to target |
| Tooling cost | Mould required, amortised over the run | No mould, only weld tooling | Soft shell viable from 500 pcs, hard case from 1,000+ |
| Empty volume | Fixed, does not compress | Rolls or folds down 30-40 percent | Soft shell wins for retail shelf and shipping |
| Access time | 4-6 seconds | 1-3 seconds with a side flap | Soft shell wins for working photographers |
| Unit weight, 12 L | 1.9-2.4 kg | 0.85-1.15 kg | Soft shell wins for anything carried all day |
| Cold behaviour | Shell becomes brittle below minus 15 degrees C | TPU laminate stays flexible | Soft shell wins for genuine cold |
The practical recommendation for most private-label photo lines is a welded soft-shell body with a moulded base pan. The base pan gives you most of the drop protection of a full case at a fraction of the tooling cost and the weight, because it reinforces the surface that actually hits the ground, and it leaves the rest of the bag soft and light enough to be carried. We reserve full moulded cases for transit and check-in briefs, and for those we go straight to a gasket latch with an automatic pressure-equalisation valve so the case can be opened after an aircraft hold cycle.
Failure Modes Found in Returned Camera Bags
The following list is drawn from the returns and warranty claims we see in this category, in rough order of frequency. Every one of them is a design or specification decision, not a manufacturing defect, which means every one of them can be prevented at the tech-pack stage at no unit cost. We share this list with clients before sampling because it is cheaper to design out than to warranty.
- Tripod lash points tearing out of the side panel. The lash is stitched to the face fabric only, with no reinforcement patch carried into the load path. Fix: a bar-tacked reinforcement panel that extends 60 mm into the body panel, not 20 mm.
- Shoulder strap webbing slipping under a 4.5 kg load. The strap is built with a plain friction tri-glide. Fix: a tooth-profile cam adjuster or a sewn stop, because a mirrorless kit with two lenses is heavier than it looks.
- Lens cradle sag after one season. The divider foam is below 25 kg/m3 and has taken a compression set. Fix: 28 kg/m3 minimum on any divider carrying a 70-200 mm class lens.
- Interior wetting from a soaked rain cover stored against the kit. The rain cover has its own pocket but shares a wall with the camera compartment. Fix: a separate external pocket with a drain grommet, isolated from the insert zone.
- Zip slider deformation from grit in coastal use. The toothed seal has no rinse path and the slider is too small for a gloved hand. Fix: a rinse channel at the base of the run and a large-format slider pull.
- Condensation fogging after cold-to-warm transits. The bag is perfectly sealed and the user never opens it. Fix: a desiccant pocket plus a printed care card, and a non-welded lid panel on daily-carry models.
Two of these six are pure cost engineering artefacts. The tripod lash and the cam adjuster are both places where a buyer can save a small amount per unit and lose a much larger amount in warranty claims, and they are the two we push back on hardest during quotation. A reinforcement patch that extends 60 mm into the body costs a few cents of fabric and a few seconds of sewing; a warranty replacement on a bag that dropped a 70-200 mm lens onto concrete costs the whole unit and the client relationship. We would rather quote a slightly higher unit price and a lower claim rate.
Carry Configuration: Backpack, Sling and Shoulder Loads
Carry configuration in the photo category is decided by how long the kit is on the person and how often it has to come off. A backpack carries a 6-10 kg kit comfortably for a full day and it is the correct answer for hiking to a location. A sling rotates to the front for access without being taken off, and it is the correct answer for street and event work where the camera comes out every few minutes. A shoulder bag is the fastest to access and the worst for sustained load, because a single strap concentrates everything onto one trapezius and the neck complains within a couple of hours.
| Configuration | Realistic kit weight | Comfortable duration | Access without removal | Typical capacity |
|---|---|---|---|---|
| Backpack, padded harness | 6-10 kg | 4-8 hours | No, must be removed | 14-30 L |
| Sling, rotating strap | 2-5 kg | 1-3 hours | Yes, rotates to chest | 5-11 L |
| Shoulder bag, single strap | 2-4 kg | 45-90 minutes | Yes, slides to hip | 4-9 L |
| Waist or belt pack | 1-2 kg | 2-4 hours | Yes, rotates on the belt | 2-5 L |
| Roller or transit case | 12-25 kg | N/A, wheeled | No | 40-90 L |
We build slings differently from small backpacks, and the difference is in the strap path. A sling strap has to cross the chest diagonally and then release, so the strap is cut on a curve and the pad is wider and shorter than a backpack pad. If you take a 6 L backpack pattern, remove one strap and ship it as a sling, it will be uncomfortable and it will rotate badly, because the pad will be in the wrong place on the trapezius. That is one of the few places in this category where we insist on separate patterns rather than a shared platform.
Strap Harness, Padding and Shoot-Day Fatigue
A photographer carrying 8 kg for six hours is a different ergonomic problem from a hiker carrying 8 kg, because the load is denser, it is less forgiving of being jostled, and the user is constantly reaching over their own shoulder. Three parameters matter: pad width on the shoulder, the stiffness of the foam in that pad, and whether the harness has a sternum strap that can be worked one-handed. Padding alone does not create comfort; a pad that is too soft collapses to nothing under 8 kg and the webbing edge then digs in.
For photo harnesses we use a 60-70 mm wide pad over a 25 mm webbing core, with EVA at 60-70 Shore A rather than the softer foam used on general-purpose daypacks. Two 5 mm ridges moulded into the underside of the pad keep a small air channel against the shirt, which matters on a hot shoot day. Our build rules are:
- Shoulder pad 60-70 mm wide, 10-12 mm thick, EVA at 60-70 Shore A, with twin moulded air channels
- Sternum strap with a one-hand-release buckle, positioned 40-60 mm below the collarbone, not at the sternum
- Load lifters at 45 degrees on any pack over 20 L, webbing not cord, because cord slips under a dense load
- A removable, non-padded waist belt on packs over 18 L, to stabilise the load without transferring weight to the hips
- A grab handle rated for a full 12 kg lift, bar-tacked into the top panel with a reinforcement patch, not stitched to the lid seam
The grab handle deserves a note because it is the part that fails first on heavy photo packs and it is the part nobody specs. A photographer lifts a loaded pack off a tailgate by the handle many times a day, and a handle stitched into the lid seam will separate within a season. We carry the handle webbing down the front face of the bag for at least 120 mm and bar-tack it to a reinforcement panel, so the load goes into the body of the bag and not into a seam.
Branding and Colourway Execution for Camera Bags
Photo buyers are unusually demanding about branding because the bag is a professional tool and a visible one. The logo has to be legible and it must not compromise the shell, which rules out several otherwise attractive processes. A direct-printed logo on a TPU-laminated face can be abraded off in a season; a heat-transfer patch on the same face can lift at the edges; an embroidered logo on a waterproof shell is a row of needle holes through the waterproof layer and is only acceptable if it is applied to a non-critical panel or backed with a tape. We recommend the following for this category:
- Silicone or TPU moulded badge, welded or sewn onto a non-critical panel, the most durable option and the most expensive
- Heat-transfer patch on a flat panel, cheap and clean, with a 3 mm rounded corner radius to stop edge lift
- Woven label sewn into a seam allowance so the needle holes sit inside the seam, not through the waterproof face
- Tonal or low-contrast execution on any bag sold as professional kit, because a loud logo reduces perceived tool value
- Reflective piping on the harness front for dawn and dusk roadside work, a functional addition that reads as a brand signature
Colourway planning for photo lines is constrained by the MOQ. Our minimum is 500 pcs per style per colour, which means a two-colour launch is a 1,000-piece commitment, and a three-colour launch is 1,500. Most photo brands launch in black plus one accent, and then add the third colour once the first order has shipped, because the black shell is the one that sells in every market. Where a client wants more colour variety without more commitment, we build the accent as a separate removable panel or a zip pull set rather than a full shell colour.
MOQ, Sampling and the Camera Bag Production Window
The commercial envelope for a photo programme is fixed and we publish it, because hidden conditions are what make OEM relationships fail. Minimum order is 500 pcs per style per colour. Sampling takes 6-10 working days for a soft-shell bag and 12-15 working days for a complex build with a moulded base pan or a hard case. Bulk production takes 35-50 days from sample approval. Inspection is to AQL 2.5 under ISO 2859-1, with the option of a tighter 1.5 level for critical defects on programmes with a high unit value. Trade terms are FOB Xiamen, with T/T 30 percent deposit and 70 percent before shipment.
Sequence from first enquiry to repeat order
- Tech pack or reference sample received, including the kit dimensions the bag must carry, not just the external volume
- Material and hardware proposal issued with the three waterproof numbers agreed: hydrostatic head, IPX target and seam method
- Prototype built on the production weld tooling, 6-10 working days, or 12-15 for a moulded or hard-shell build
- Water, drop and abrasion testing on the prototype, with the test report issued alongside the sample, not after it
- Sample revision round if needed, typically one round for photo programmes, at 6-10 working days
- Approval, deposit, and bulk production in 35-50 days with in-line inspection and a final AQL 2.5 inspection
- Repeat orders run from the retained tooling and the stored pattern, with a shorter 30-40 day window
QUANZHOU JUNYUAN BAGS has produced sewn and welded bag programmes since 2014, and our founder has worked in the category since 2004. Our validated production partner facility is SGS-verified at 4,950 square metres with 7 production lines, 149 machines, 137 staff and a monthly capacity of 200,000 pieces. The quality system runs to ISO 9001-aligned procedures, and the site is not currently BSCI-audited. Product compliance covers CE, CPC, RoHS and REACH requirements, and material declarations are supported by SGS testing. For a photo programme we add the drop, spray and shower test reports to that file, because those are the ones that protect a camera kit. Reach us at service@junyuanbags.com or on WhatsApp at +86 177 5002 0688, or start from our custom development page.
Frequently Asked Questions
Q1: What hydrostatic head should a waterproof camera bag specify?
A: Specify 10,000 mm minimum for a lightweight or daily-carry photo shell and 20,000 mm+ for expedition, marine-adjacent or submersible programmes. The number is measured to ISO 811 and it describes the shell fabric only, so it must be paired with a separately specified seam method and a closure IPX target under IEC 60529 before it means anything for the contents.
Q2: Is a rain cover enough to protect a camera bag?
A: A rain cover is a supplement, not a solution. It works well for a shower but it lifts in wind, it pools water at the base, and it leaves the harness and the back panel unprotected. For a serious photo programme we specify 10,000-20,000 mm shell fabric with welded or taped seams first, and then treat a rain cover as an optional accessory for sustained downpours.
Q3: What is the difference between IPX6 and IPX7 for a camera bag?
A: IPX6 under IEC 60529 means the bag survives a strong water jet of 100 L/min from 3 m for 3 minutes, which covers driving rain and deck spray. IPX7 means it survives 30 minutes at 1 m immersion, which covers a bag going overboard or being dropped in a stream. A roll-top build can reach IPX7, whereas a storm-flap build typically tops out at IPX6.
Q4: How much foam density do camera bag dividers need?
A: Use 28 kg/m3 closed-cell PE as the working minimum for dividers carrying a 70-200 mm class lens, and 25 kg/m3 for smaller mirrorless kits. Below that the foam takes a compression set and sags within a season, which lets a heavy lens shift during transit. Compression set should be under 10 percent after 22 hours at 70 degrees C.
Q5: Why do you drop-test camera bags at 1.2 m?
A: Because 1.2 m corresponds to hip height, which is where a bag falls from when it slides off a table, a tailgate or a boat thwart. We test at that height with the real kit weight inside, in six orientations, and we repeat the whole sequence at minus 10 degrees C because a stiffened PVC shell splits at low temperature where a TPU laminate deforms and survives.
Q6: Can an embroidered logo be used on a waterproof camera bag?
A: It can, but the needle holes pierce the waterproof layer, so it must be placed on a non-critical panel or applied over a backing tape. The more durable options for this category are a silicone or TPU moulded badge welded onto the panel, or a heat-transfer patch with a 3 mm rounded corner radius to prevent edge lift.
Q7: What causes condensation inside a waterproof camera bag?
A: Condensation happens when a cold, closed bag is moved into warm air, and the moisture in the trapped air condenses onto the coldest surfaces, which are the glass and the metal lens barrels. A perfect external seal makes it worse, not better. We address it with a 40 g desiccant pocket at the base panel and a non-welded lid panel on daily-carry models.
Q8: What is the minimum order for a custom camera bag programme?
A: The minimum is 500 pcs per style per colour. A two-colour launch is therefore a 1,000-piece commitment. Most photo brands launch in black plus one accent and add further colours on the second order, or they build the accent as a removable panel or zip pull set so the variety does not multiply the commitment.
Q9: How long does camera bag sampling take?
A: Sampling takes 6-10 working days for a soft-shell backpack, sling or shoulder bag, and 12-15 working days for a complex build involving a moulded base pan, a hard-shell case or custom hardware. The sample ships with its water, drop and abrasion test reports so the results can be reviewed together rather than in sequence.
Q10: What is the bulk production lead time for photo bags?
A: Bulk production takes 35-50 days from sample approval, depending on fabric availability and on whether any moulded components are involved. Repeat orders placed against retained tooling and stored patterns typically run in a shorter 30-40 day window. All shipments move on FOB Xiamen terms with T/T 30 percent deposit and 70 percent before shipment.
Q11: Which inspection standard do you apply to camera bag orders?
A: We inspect to AQL 2.5 under ISO 2859-1 as the standard level, and we can tighten to 1.5 for critical defects on programmes with high unit values. Critical defect classification for a photo bag includes any seam tape lift, any closure that fails a water test, and any divider or lash point that shows reinforcement missing from the load path.
Q12: Should a camera bag use a hard shell or a soft shell?
A: Use a soft shell for anything carried on the person, because it is lighter, it compresses when empty and it is far faster to open. Use a moulded hard shell only for transit, check-in or expedition briefs where the impact risk dominates. A welded soft body with a moulded base pan gives most of the drop protection at a fraction of the tooling cost and weight.
Q13: What colourways make sense for a first photo bag order?
A: Launch in black plus one accent colour, because black shells sell in every market and it keeps the first commitment to 1,000 pieces across two colours at 500 pcs each. Add further colours after the first shipment has proven demand. Reflective piping on the harness is a good functional addition for roadside and dawn work.
Q14: How do you prevent tripod lash points from tearing out?
A: We bar-tack the lash reinforcement at least 60 mm into the body panel rather than 20 mm, so the load path is carried into the shell and not into a seam. A lash point stitched to the face fabric with a short patch will tear out under a 1.2 kg tripod within a season, and it is the single most common avoidable failure on photo backpacks.
People Also Ask
- What makes a camera bag actually waterproof?
- Do I need IPX7 or IPX6 for a camera bag?
- How do I stop condensation forming inside a camera bag?
- What foam density should camera bag dividers use?
- Is a hard camera case better than a padded camera backpack?
- How much weight can a camera backpack carry comfortably?